
ImageEngine is transitioning to a new product line based on ImageEngine Kube (self-hosted, flat-rate) and a free Sandbox for non-commercial testing. Some plan names, pricing, and sign-up steps described below may no longer apply. For current information, please see imageengine.io/pricing or contact sales.
ImageEngine is a pull-based Image CDN that will pull an image from its origin on-demand and optimize it. ImageEngine can be integrated into your existing infrastructure within minutes.
Just configure your existing image origin, and ImageEngine will fetch the images on the first request, cache the response, and deliver optimized images.
We do this through an "Engine," a relationship between the image origin and a Delivery Address.
Key Elements of an Engine
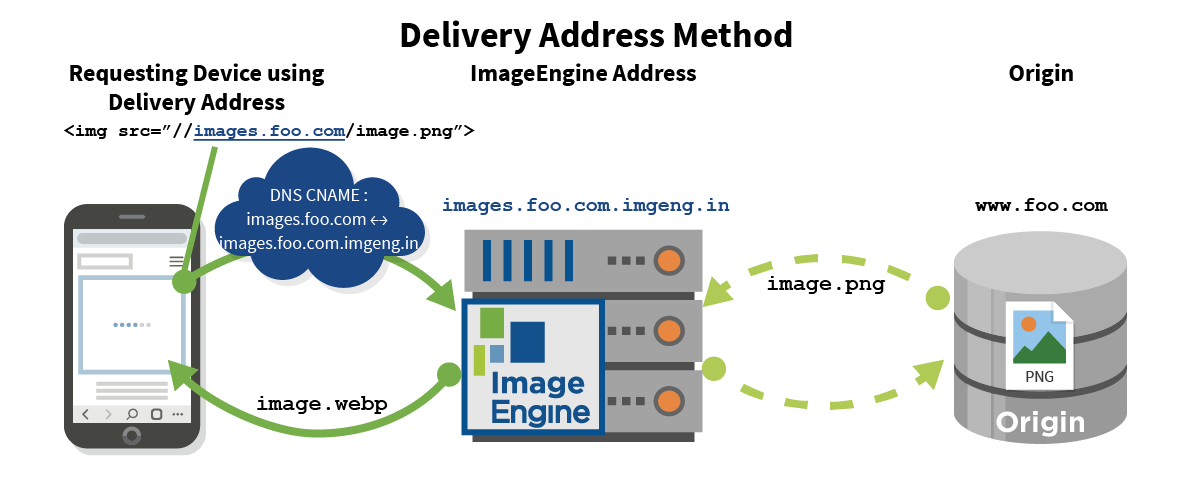
Delivery Address: A Delivery Address is where you should direct requests for images. ImageEngine Kube customers use a hostname they own (e.g. images.foo.com), configured to point at their Kube deployment. Sandbox and legacy SaaS customers on plans that include the Custom Delivery Address feature can also configure a custom domain; otherwise, the delivery address is an ImageEngine-provided imgeng.in address.
ImageEngine Address: The ImageEngine Address handles your account’s images on the imgeng.in domain.
An uncustomized delivery address and its ImageEngine Address will be identical. When using a custom delivery address, this record will be used in the CNAME record to direct the Delivery Address to the ImageEngine Address. For more on setting up a custom delivery address, please see Delivery Address
Origin: This is where your web content, such as images, is stored. You can store your images on a web server accessible via HTTP or HTTPS, S3, or cloud-based storage.
ImageEngine does not need you to move or upload images anywhere.
Putting the Pieces together
If an optimized version of the image tailored to the requesting device is already cached on the edge server, ImageEngine will deliver it immediately. ImageEngine’s edge servers will store several optimized images based on the capabilities of the requesting devices or browsers, each with a unique cache key.
If an optimized image is not in ImageEngine’s cache (typically the very first time an image is requested), then ImageEngine will fetch the image from the origin. ImageEngine will resize, compress, and convert the image into its optimal format. During these first optimizations, ImageEngine will serve the original (unoptimized) image until the ImageEngine cache is “warmed” or “primed” to avoid any delays for users requesting images. Therefore, you should send a fair amount of traffic and monitor the cache hit rate before evaluating the effectiveness of the image payload optimization and page load time.
Once fully operational, the ImageEngine CDN cache typically handles 98% of the traffic. In comparison, the origin servers see only 2% of the actual traffic while providing up to 80% or more in payload savings.
Before You Begin
Make sure you:
- [ ] Have access to modify image URLs in your code or CMS
- [ ] Know your current image origin URL (e.g., `https://www.yoursite.com` or S3 bucket)
- [ ] A way to test changes (staging environment or test page)
Time to implement: Most customers complete basic integration in 15-30 minutes.
Integration Methods
We have implementation guides and plugins available for many common platforms and technologies. Please see them here: Integration Guides and Plugins
To implement ImageEngine on your website, you have two options for directing traffic to ImageEngine via updating img src tags: the Delivery Address Method and the Prefix Method.
Which Integration Method Should I Use?
Choose Delivery Address Method if:
- ✓ You have one primary image origin
- ✓ You want clean, simple image URLs
- ✓ You're using a CMS with ImageEngine plugins available
Choose Prefix Method if:
- ✓ You have multiple image origins (CDN, S3, different servers)
- ✓ You want to test ImageEngine with different environments
- ✓ You need flexibility to switch origins without reconfiguring
Not sure? Start with Delivery Address Method—it's simpler and covers 99% of use cases.
1. Delivery Address Method
Once you have set up your account and have configured an Engine, find your engine's Delivery Address in its overview.
To optimize images, you must modify your img src attributes to direct requests to the Delivery Address. Copy the Delivery Address, and insert it into the img src attribute.
For example, the original image src attribute was <img src="https://www.foo.com/image.jpg">
and your Delivery Address is images.foo.com,
then, you will modify your image src attribute to<img src="https://images.foo.com/image.jpg">
Note: The example above uses a custom delivery address. Implementation is exactly the same if you do not have a custom address set up and are using an ImageEngine address.
Here is an animation of what this looks like:
2. Prefix Method
You can prefix any image origin URL with a Delivery Address, regardless of whether it is a custom domain or an ImageEngine Address.
This is a great option if you have multiple origins you want to serve through the same Delivery Address. It is also a great method for testing ImageEngine with different environments.
In the control panel, you may restrict which origins can be prefixed.
For example. if the original image src attribute was
<img src="https://www.foo.com/image.jpg">
and your Delivery Address with HTTPS isimages.foo.com
then you will modify your image src attribute to<img src="https://images.foo.com/https://www.foo.com/image.jpg">
Optional: Manual resizing control, other directives, and Engine delivery options
ImageEngine works automatically without any configuration. However, you can optionally use directives to manually override specific optimizations—such as forcing a particular width, format, or fit method.
For the complete list of available directives and examples, please see the Directives article.
Adjust Engine delivery options
Each Engine can have settings for adjusting the delivery of large sets of images, please view our article on Customizing Engine Image delivery.
Ready for Production?
Once you've tested your implementation, see our comprehensive Advice for Going Live with ImageEngine guide, which covers:
- Cache warming strategies
- Temporary Origin Image Fallback settings (serve original images while optimized versions are prepared)
- Verification and monitoring
- Preparing your origin servers for the transition
Next Steps
For a successful implementation:
1. Test thoroughly- See Advice for Going Live for production deployment tips
2. Optimize performance- Review Best Practices with ImageEngine for advanced techniques
3. Use responsive images - Learn about Responsive Images Best Practices for optimal delivery
4. Need help? - Contact support at control.imageengine.io/support or check our Integration Guides
Quick verification
After implementation, verify ImageEngine is working:
1. Open browser DevTools → Network tab → reload page
2. Check image response headers for `server: ScientiaMobile ImageEngine`
3. Compare file sizes—you should see 40-80% reduction
For detailed verification steps, see How to Inspect Images.
Comments
0 comments
Article is closed for comments.